Brute Forcing With Hydra

Brute force with hydra!

What is Hydra:

Hydra is a classic, fast network logon cracker that was created by Van Hauser. It is commonly used as a network logon cracker. The tool is great since it’s both fast and have built-in support for many different protocols.

You can find the code at:
https://github.com/vanhauser-thc/thc-hydra

How to install Hydra:

Hydra comes pre-installed with Kali Linux but if you are running another distributions you can simply install it from source by running the following commands

cd /opt
git clone https://github.com/vanhauser-thc/thc-hydra.git
cd thc-hydra
./configure
make
make install

Brute force vs dictionary attack:

The differences between a pure brute force attack and a dictionary attack from a technical point of view are pretty small. A pure brute force attack tests all possible combinations while a dictionary attack uses a word list with just selected combinations, usually default passwords and real passwords from data breaches. Running attacks with word lists are usually the first step to try in hope of finding the password quick. If the password is very strong pure brute force is the way to success.

Hydra requires you to use either a single password or a word list. It’s the same with usernames, either a single username or a word list with usernames.

A great feature that Hydra provides is that you can generate a word list if you are looking for pure brute force. It can be done with parameter -x. I will show you an example in the next section.

Common general parameters with examples:

You can find all parameters with -h but I describe some of the commons ones below.

-l = single username
Example : hydra -l admin

-L = list of usernames
Example: hydra -L /usr/share/wordlists/common-usernames

-p = single password
Example: hydra -p password1

-P = list of passwords
Example: hydra -P /usr/share/wordlists/common-passwords

-s = define port (if non standard for protocol)
Example: hydra -s 1337

-o = write result to a file instead of stdout
hydra -o result.txt

-x = Brute force mode
You can run hydra -x -h to get the full help menu for brute force mode but the the logic is
-x MIN:MAX:CHARSET

So if you for example know that the password requirements are minimum 6 characters and the password needs to contain uppercase, lowercase and numbers you would probably go for:
-x 6:8:aA1
This will generate a list of all possible password that are between 6-8 characters and contains uppercase, lowercase and numbers that will be used for your attack. Example:

hydra -x 6:8:aA1 -l root 192.168.0.1 ssh

Examples:

Some examples on how you can use Hydra for different protocols.

FTP:
hydra -l admin -P /usr/share/wordlists/rockyou.txt 192.168.13.37 ftp -o ftp-result.txt
TELNET:
hydra -L /usr/share/wordlists/common-usernames -P /usr/share/wordlists/rockyou.txt 192.168.13.37 telnet
HTTP Forms:
hydra -l admin -P /usr/share/wordlists/rockyou.txt 192.168.13.37 http-post-form “/hiddenlogin/login.php:username=^USER^&password=^PASS^&Login=Login:Login Failed”
SSH:
hydra -l root -P /usr/share/wordlists/rockyou.txt 192.168.13.37 ssh -o ssh-result.txt
In this example I used the Hydra machine from TryHackMe.com to demonstrate the example.

I hope this guide was helpful. If you have any questions you can contact me on twitter (@tzusec).
// Rickard

Cracking KeePass Database

In this post I will describe how you can crack a KeePass Database file (.kdbx) in an easy way. Or to be correct we are not cracking the DB, we are cracking the password hash.

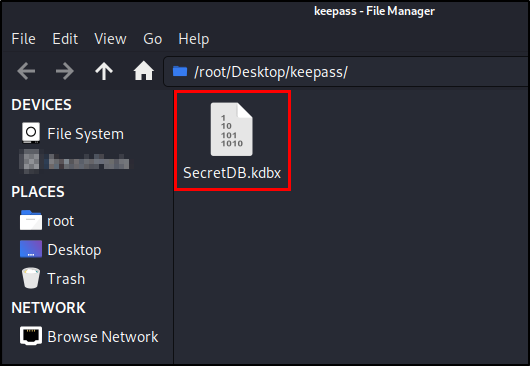
To demonstrate this I created a new database that I called “SecretDB.kdbx” and our mission will be to find out which master password I chose for the database.

Keepass-DB-file

To be able to crack the hash we will need to extract and save it and that can be done with the John the ripper utility tool “keepass2john“. It comes with Kali Linux so you don’t have to install it.

What you do to extract the hash is really simple, you just run:

keepass2john SecretDB.kdbx


You can also send the output to a file by adding “>” like I did in the screenshot below.

keepass2john SecretDB.kdbx > Keepasshash.txt

keepass2john-screenshot

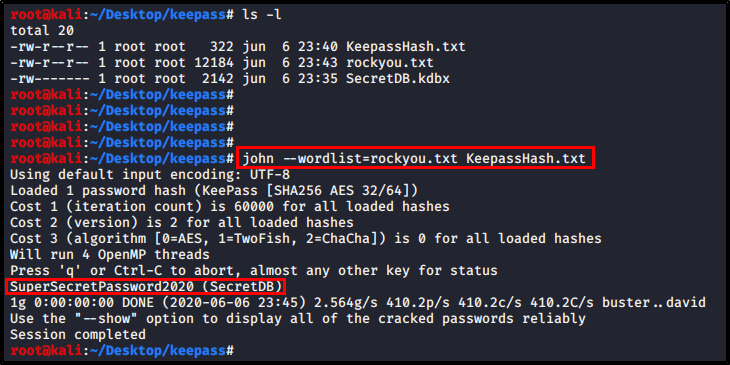
We now have our hash ready to be cracked. In this example we will try to crack it using a dictionary and John the ripper. I used a modified version of rockyou.txt as dictionary. You can also use other great cracking tools like hashcat but I went with john here.

We run john and specify our custom wordlist with “–wordlist” parameter and then define our hash file.

john --wordlist=rockyou.txt KeepassHash.txt

We then just let it run for some time and as soon as we crack the hash it will be displayed. As you can see in the screenshot we did crack the hash and the password of this SecretDB.kdbx-database was “SuperSecretPassword2020”.

I hope you found this post useful and make sure to not use weak password for your database.

// Rickard

How to crack hashes with John the Ripper – Linux

In this post I will show you how you can crack passwords with John the Ripper. We will start off by collecting the hashes from a linux machine, then use the tool unshadow and at last crack the hashes with John the Ripper.

john the ripper

1 – Collect hashes from a Linux machine
We will start with collecting the hashes from the target machine. We will need both /etc/passwd and /etc/shadow. Save them to your Kali Linux machine, preferably on the desktop. It can be done with the following commands.
cat /etc/passwd > ~/Desktop/passwd.txt

/etc/passwd

cat /etc/shadow > ~/Desktop/shadow.txt

/etc/shadow


2 – Combine passwd and shadow with unshadow
Now we need to combine these two files into one. This can be done with the tool unshadow.
unshadow passwd.txt shadow.txt > hashtocrack.txt

unshadow passwd and shadow files


3 – Crack with John
Now we are ready to crack the hashes. John can run in different modes. You can use wordlists or straight brute force. The method I will use in this example is wordlist mode since that is the most effective way. Brute forcing takes a lot of time and I recommend you to only use it as a last resort when your wordlists won’t crack the hashes. In this example we define the wordlist to use to the built in rockyou.txt.
john --wordlist=/usr/share/wordlists/rockyou.txt hashtocrack.txt

crack with rockyou.txt

4 – Show cracked credentials
If you let john run you will be prompted with the credentials as soon as they have been cracked. In this example we can see that the the password for the user SuperAdmin was Password1.

We can also come back at a later time and check the credentials again by defining the unshadowed file and add the parameter –show.

john hashtocrack.txt --show

//Rickard

How to use Undercover-mode in Kali Linux

Yesterday a new version of Kali Linux were released, Kali 2020.1. You can download it here. Make sure that you have read the release notes to make sure that you don’t break anything you don’t want.

Upgrade your existing machine:

  1. Run sudo apt full-upgrade -y
  2. Wait for the job to finish.
  3. Verify that you got the new version by running
    cat /etc/os-release
    Verify-installation

How to use undercover mode in Kali Linux 2020.1:
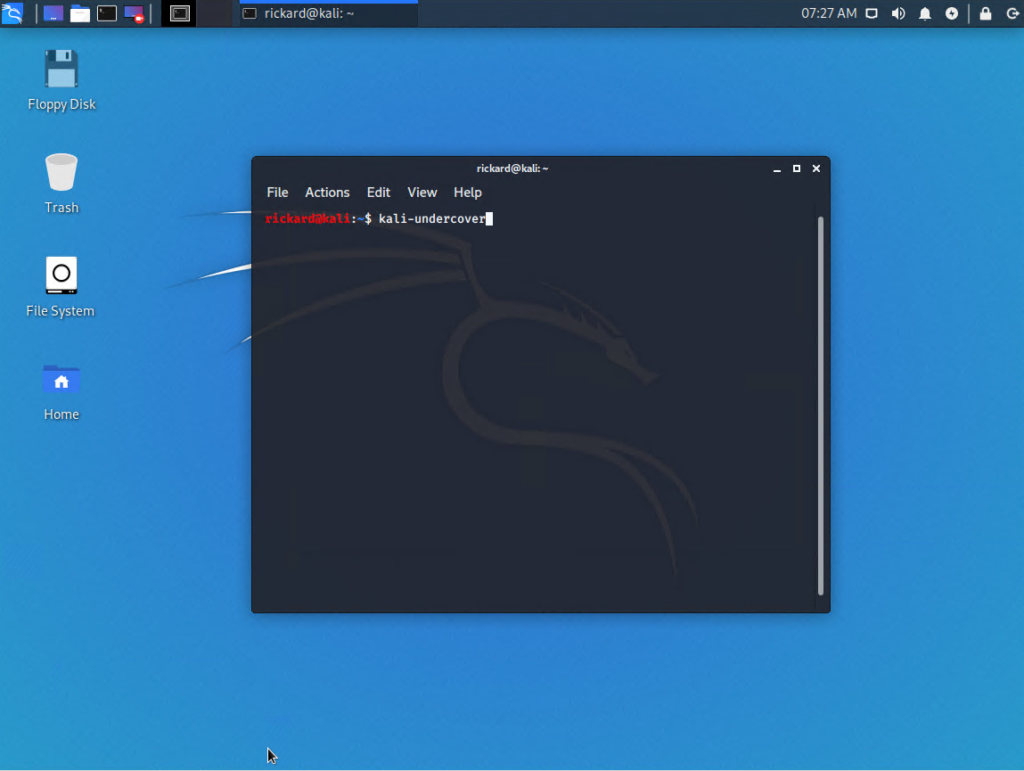
Undercover mode is a new feature for version 2020.1 that will help you hide that you are a super elite hacker when you are out in public by temporarily changing the desktop to look like a Windows 10 machine. I’m not sure I see the real use cases for this but it’s actually a funny feature. To use it you just need to run kali-undercover.

Kali undercover

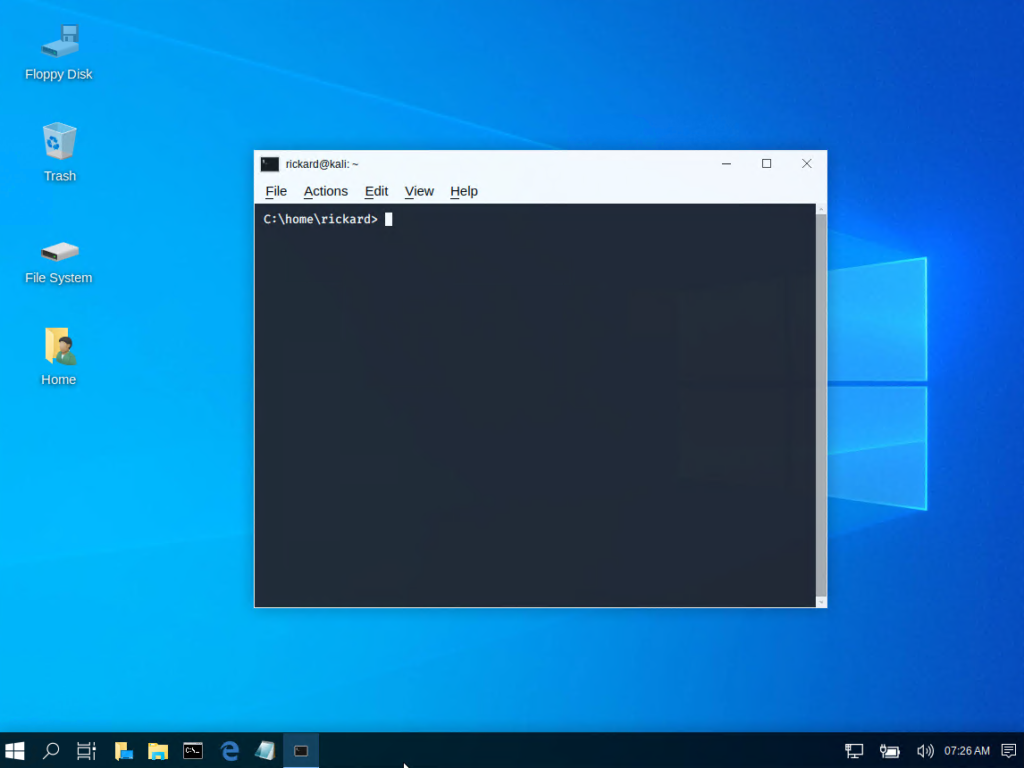
After a few seconds you will see a Windows 10-like appearance, pretty cool.

Windows10-like-Kali-Linux

Httprobe

This post is about httprobe which is a tool for quickly probing for active http and https servers. If you have a list with subdomains you can quickly check which are active by using this tool. Httprobe is available on Github and the tool was created by Tom Hudson (@tomnomnom on Twitter).

Pre requisites:
1. You need to have Golang installed. If you haven’t used golang before and need help to get started, read my guide on how to install Golang on Kali Linux

2. Download ‘httprobe’ by running
go get -u github.com/tomnomnom/httprobe

3. If you used my guide to install Go you can now find ‘httprobe’ at:
/root/go-workspace/bin/assetfinder

Basic usage:
To use httprobe you need to print out your domains and pipe them to httprobe. In the example below we are are using cat to read the data from domains.txt and gives its content as output to httprobe.
cat domains.txt | httprobe

Adding extra ports:
By default httprobe is probing for http on port 80 and https on port 443. We can add other ports by using the ‘-p’ parameter.
cat domains.txt | httprobe -p http:8080 -p https:8443

Skip default ports and only probe for defined ports:
By adding ‘-s’ parameter the default ports will be ignored.
cat domains.txt | httprobe -s -p http:8080 -p https:8443

Specify a timeout:
If you know that the response time on the target server might be high you can specify a custom timeout by using the ‘-t’ parameter. The time is configured in milliseconds.
cat domains.txt | httprobe -t 10000

Combine with other tools:
You can combine ‘httprobe’ with other tools such as ‘assetfinder’. If you don’t know about assetfinder you can read my earlier post that helps you getting started with assetfinder.

One example on how you can chain assetfinder with httprobe.
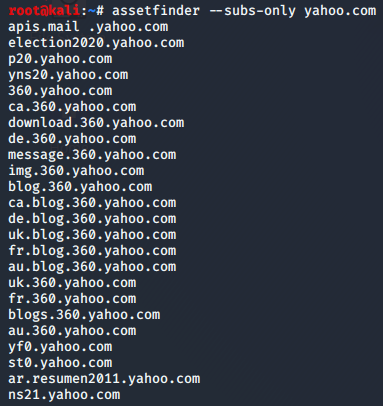
assetfinder --subs-only yahoo.com | httprobe -s -p http:80
In the example we first searched for subdomains at yahoo.com and piped the result to httprobe to find out which of the subdomains that were listening on port 80.
assetfinder+httprobe

Assetfinder

reconnaissance

In this post I will write a bit about Assetfinder which is an quick and awesome tool for finding subdomains. The tool is available in Github and was created by Tom Hudson (@tomnomnom on Twitter).

According to the information on Github, Assetfinder uses the following resources to find subdomains

  • crt.sh
  • certspotter
  • hackertarget
  • threatcrowd
  • wayback machine
  • dns.bufferover.run
  • facebook
  • virustotal
  • findsubdomains

Pre requisites:
1. You need to have Golang installed. If you haven’t used golang before and need help to get started, read my guide on how to install Golang on Kali Linux

2. Download assetfinder by running the following command.
go get -u github.com/tomnomnom/assetfinder

3. If you used my guide to install Go you can now find assetfinder at:
/root/go-workspace/bin/assetfinder

How to use Assetfinder:
Navigate to assetfinder and run
./assetfinder exampledomain.com
If you only want the subdomains you can add –subs-only.
./assetfinder --subs-only exampledomain.com

assetfinder --subs-only
Save the output to a file:
You can also save the output to a file by adding “> filename”
./assetfinder --subs-only exampledomain.com > domains

Assetfinder - Save output

The tool is really quick so it is perfect to use it when you want a fast way to find subdomains for a target company. I really love this tool. <3

Crunch

Today I will continue to write about tools that you can use to generate wordlists. Today we will take a look at crunch.

crunch
Where you can find crunch in Kali Linux.

Background and the functionality:
Crunch is another great tool that can be used to create wordlists. The tool was initially released in 2004 and the author is bofh28 according to tools.kali.org.

You use the tool to generates wordlists based on the charset you specify.

How to get started with Crunch:
To make sure that you have crunch installed, which comes pre-installed with Kali, you just open up the terminal and write crunch.

installed

If you start off by running the tool with only the required parameters you will get all possible words using all characters. So if you for example run “crunch 8 8” you will get all words that are eight characters long.

You can also specify which characters you want to use for your wordlist.

t-768x390

In the example above you can see that we specified all worlds between 5-6 that uses the following charcters: abcd123.

3-2
Here you can see the start and end of the file we just created.

-o
With the -o variable you can chose where the output should be saved.
Example: crunch 8 8 -o wordlist.txt

-b
With the -b parameter you can specify how big wordlist-files you want. In the example below I first created a wordlist with the size of ~2kB. When I use the -b parameter to define that each file only can be 1kB big you see that three files was created instead and none of them were bigger than 1kB.

b
An example of how you can use the -b parameter.

-i
With the -i parameter you can invert the order of the words. If you use crunch 3 3 without using the -i parameter you will get a file that starts with

  • aaa
  • aab
  • aac

If you use -i you will instead get the following result:

i

-t
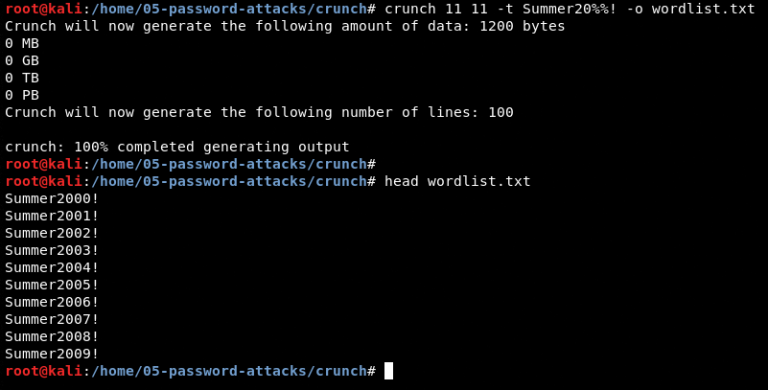
The -t parameter is one of my favorites to use. If you know that a password uses a special pattern you can use the -t parameter to specify that pattern and reduce the amount of words in your list significantly and make your wordlist more efficient.

A normal use case can be that you got information about that many users in your targets company creates passwords based on the current season, for example Summer2019! . You can then create a wordlist based on that structure.

t-768x390
An example on how you can use the -t parameter.

You can use the following characters to build your patterns:

  • @ will insert lower case characters
  • , will insert upper case characters
  • % will insert numbers
  • ^ will insert symbols

-z
You can also use the -z parameter to compress and create an archive-file. You can choose between gzip, bzip2, lzma and 7z. Gzip is fastest but compression is minimal while 7z is slowest with best compression.

z
An example on how you can use the -z parameter.

That was everything for this time. Please contact me if you feel like I missed something or if you want to share any special tips and tricks for Crunch.

Thanks
/R

Cewl

This is the first blog post in my series where I will go through all built-in Kali Linux tools. I will write information about how the tools work and give you examples on when to use them. This will be an excellent way for me to learn the tools in depth and hopefully it can come in handy for some of you.
I won’t get much enjoyment if I write about them in one by one from top to bottom since that will be boring. The first tool I will write about is from section 05- Password Attacks and the tool I have chosen to start with is CeWL.

Background and the functionality:
CeWL is a tool that was created by Robin Wood and it is used for creating custom word lists based on the text from a target website. It can come in handy to use this tool if you are doing a pen test and you haven’t been successful with your usual word lists and want to create one that is more customized for the target company.

cewl
CeWL from Kali Linux

CeWL are built in Ruby and the main idea is that the program spiders the specified URL according to the configuration and returns a list of words that was found on that site. These custom word lists can later be used when trying to crack passwords with the other available tools. In a later post I will show you how that is being done.

How to get started with CeWL:
So how do you use CeWL then? It’s pretty easy and straight forward and you can get out the most information from the manual which you get by running “man cewl”. I will go through some of the most common options that you can configure and these are:

  • -w
  • -d
  • -m
  • –with-numbers
  • -c
  • -e

-w
Define where the word list should be saved. example: customwordlist.txt
-d
Define the depth the scan should spider. Default value is 2 and that means that it will go to all links that are presented on the defined URL and collect words from them as well.
-m
Define the minimum length of a word. No words with less characters than this will be saved.

So let’s try it and see how it works in practice. For this example I will just use a website that I know include many words and which site are better than Wikipedia? I’ve set the parameters to depth = 1 and characters = 10.

An example on how to use CeWL to generate a custom word list based on a URL.

It can take some time if you want to spider through many sites but if you use a configuration like mine it will be very quick and in this example I got out 1895 useful words.

wordcount
An example on how you can count the number of files in the file.

–with-numbers
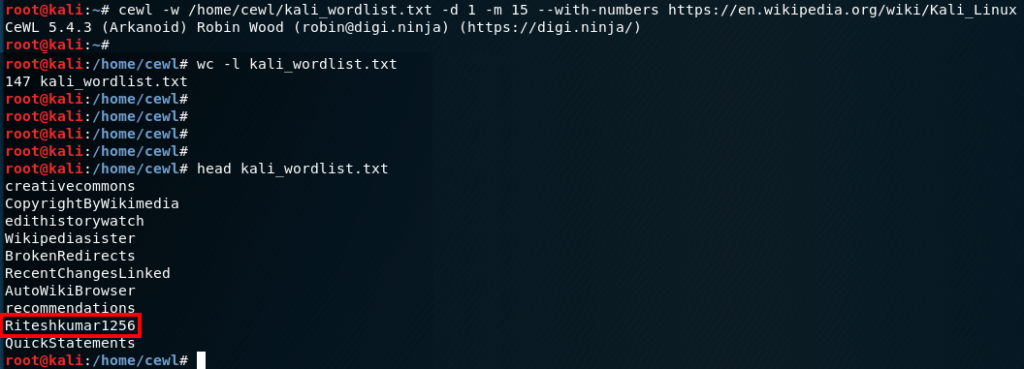
Accept words where numbers are included as well. Like for example the word below. “Riteshkumar1256”.

In the figure you can see the first ten entries in the list that was created.

-c – counts number of entries
If you add the -c parameter the tool will also count how many times each word was found on the site. You can use that for many purposes and one example is that you easy can find out which words the company likes to mention and that might be something users uses in their passwords.

An example on how you can use the -c parameter for CeWL.

-e – includes email addresses
You can also save all email addresses that can be found on the website to a file. Perfect for recon and helps you find mailboxes at the target company. If you also include –email file you can specify where you want to save the emails addresses.

An example on how you can use the -e parameter for CeWL.

That was everything for this time. Please contact me if you feel like I missed something or if you want to share any special tips and tricks for using CeWL?

Thanks
/Rickard

Copyright © 2022