Are you running gophish straight from shell and want to make sure to not close the application by mistake during a phishing assessment? Or maybe that was what led you to this article? No worries, in this article I will show you how easy it is to run it as a service with systemd instead.
If you haven’t heard about systemd before it’s simply a very popular tool used to manage services on Linux systems. A systemd service is a script that runs a specific program or command. This script is managed by systemd and can be configured to start automatically at boot time if you like.
Step-by-step guide:
I will now describe the simple steps that you need to take to create and then manage the service with systemctl:
Create the service file that will tell systemd how to manage our gophish service. We create the file by opening up a new file with the text editor of your choice
sudo vim /etc/systemd/system/gophish.service
Now it’s time to enter the following text into the new file and then save it, replace WorkingDirectory and ExecStart with the location where you installed gophish:
phpIPAM is an awesome IP address management application. I have used it for many years and really like it. In this guide I will show you how you can schedule automatic backups of your IPAM and how you easily can restore the database if something goes wrong.
Create a file for your credentials This is done to prevent the credentials to be stored in clear text inside crontab. touch ~/.msql.cnf vim ~/.msql.cnf #[mysqldump] #user=root #password=*yoursupersecretpassword*
Restrict permissions to file chmod 600 ~/.msql.cnf
Add to cron – backup the database every day at 23:00 crontab -e 0 23 * * * mysqldump --defaults-file=~/.msql.cnf phpipamdb01 > /mnt/backups/phpipam/db/phpipamdb01_$(date +"%F")_bak.sql
Remove old backups
You can easily remove your old backups (30 days+) by running the command below. find /mnt/backups/phpipam/db/ -ctime +30 -delete
So what you can do is just adding that command to crontab like I showed you in the example above. But I personally don’t like that approach because if someone changes the date/time on your server there is a risk that all of the backups gets removed and you don’t want to risk that. To make sure that the time is configured correctly you can first verify that NTP is synchronized before you remove the old backup files. (This of course assumes that your NTP servers provides you with the correct time) You can create a simple bash script that will verify that NTP is being synchronized and if it’s not synchronized you will get notified by email:
Create the script vim rm-old-backups.sh # #!/bin/bash # #Simple script to remove old phpIPAM backups if NTP i synced. # #By: Rickard Carlsson (@tzusec) # #IF NTP WORKS THEN REMOVE FILES # if (ntpstat | grep -qF "synchronized to NTP server") # then #_____find /mnt/backups/phpipam/db/ -ctime +30 -delete # else # ____mail -s "NTP-error - Backups won't be deleted" rickard@tzusec.com <<< 'NTP wasn't synced so no old backups were removed.' # fi
Make the script executable chmod +x rm-old-backups.sh
Verify that it works as expected Manually run the script to make sure that is works as you want.
Add it to cron – remove old backups once every day at 23:30 crontab -e 30 23 * * * /root/rm-old-backups.sh
Restore database
Locate the backup you want to use ls -l /mnt/backups/phpipam/db/
Restore the database from the backup mysql -u root -p phpipamdb01 < /mnt/backups/phpipam/db/phpipamdb01_*DATE*_bak.sql
I hope this guide was useful for you. Reach out to me on twitter @tzusec if you have any questions.
In this blog post I will give my review on the latest certification I obtained, Hashicorp Terraform Associate. I will start by describing what Terraform is and then give you my take on how to study to pass this exam at your first attempt.
What is Infrastructure as Code (IaC)
If you are not familiar with the concept of IaC I would recommend you to watch this quick explanation.
What is Terraform
Terraform is an open-source software tool for IaC created by HashiCorp. The tool helps users to define and provision a cloud infra the Hashicorp Configuration Language (HCL), or optionally JSON. Three days ago they also released a CDK with Python and Typescript support. Terraform supports most of the big of cloud infrastructure providers.
Exam details
The exam is online based and you will be monitored by a proctor. To be able to do the exam you will need to have a webcam, speakers, a microphone and the zoom client installed.
Exam cost: The website says $70.50 plus taxes, for me the total cost including taxes were around 90 euro which is very cheap compared to other certifications.
Study plan
In this section I will describe how I recommend that you study for this exam. When talking about certifications people always wonder how long time it takes to study for the exam. The answer to that question is the same as always, it depends on your background, your motivation to learn, how much time you can put into it and how easy you have to learn new stuff.
I had no prior knowledge of IaC before starting to study for this exam and I was able to learn the concepts to pass this exam in around two weeks. I have heard people saying that it is recommended to have 1-2 years of experience with Terraform before taking the exam but I don’t think that is necessary.
If you follow my study plan below I don’t think that you will have any problems with passing the exam.
If you have some experience with Terraform and just want to fresh up your skills before the exam you can read the official exam review instead.
Spin up a Lab environment I used Microsoft Azure for this since I’m familiar with Azure and the fact that Microsoft offer you a $200 credit to explore Azure for 30 days. I think that most cloud providers offer similar stuff so choose the cloud provider of your taste and spin up a lab environment.
Installation guide and videos on how to get started are included in the study guide but here is a link directly to the installation video.
Video courses combined with lab time My third recommendation is to watch some video courses. Learning from videos is my personal favorite and I really recommend that you watch the videos and try to follow the instructor in your own lab environment. The best video series I found online was on Youtube and it was created by Will Brock. Really awesome content that I highly recommend you to watch.
Practice exams When you feel like you understand everything in the videos and have spent some hours in you lab environment I recommend you to do some practice exams so you get a feeling on how the questions will be structured on the real exam. I did some practice exams on Udemy after getting a free voucher from the creator. He shared it in the subreddit /r/Terraform so keep an eye there.
I also found an awesome blog post by a guy named Bhargav Bachina. He goes through each of the exam objectives and have created practice questions based on the objectives. In total there are 250 questions. I really recommend you to read this one.
Summary
When you have completed the steps above you should be ready for the exam. I think that the exam was very fair and I would say that 60min is more than enough time. I think that I had around 20 minutes left when I pressed submit.
In summary I would say that Terraform is a really awesome tool and that the certification was fun. I hope you liked this post. If you have any questions, feel free to send me an email or contact me at twitter. (@tzusec)
This post is about httprobewhich is a tool for quickly probing for active http and https servers. If you have a list with subdomains you can quickly check which are active by using this tool. Httprobe is available on Github and the tool was created by Tom Hudson (@tomnomnom on Twitter).
2. Download ‘httprobe’ by running go get -u github.com/tomnomnom/httprobe
3. If you used my guide to install Go you can now find ‘httprobe’ at: /root/go-workspace/bin/assetfinder
Basic usage: To use httprobe you need to print out your domains and pipe them to httprobe. In the example below we are are using cat to read the data from domains.txt and gives its content as output to httprobe. cat domains.txt | httprobe
Adding extra ports: By default httprobe is probing for http on port 80 and https on port 443. We can add other ports by using the ‘-p’ parameter. cat domains.txt | httprobe -p http:8080 -p https:8443
Skip default ports and only probe for defined ports: By adding ‘-s’ parameter the default ports will be ignored. cat domains.txt | httprobe -s -p http:8080 -p https:8443
Specify a timeout: If you know that the response time on the target server might be high you can specify a custom timeout by using the ‘-t’ parameter. The time is configured in milliseconds. cat domains.txt | httprobe -t 10000
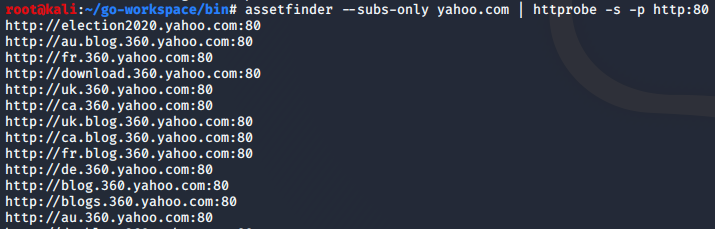
Combine with other tools: You can combine ‘httprobe’ with other tools such as ‘assetfinder’. If you don’t know about assetfinder you can read my earlier post that helps you getting started with assetfinder.
One example on how you can chain assetfinder with httprobe. assetfinder --subs-only yahoo.com | httprobe -s -p http:80 In the example we first searched for subdomains at yahoo.com and piped the result to httprobe to find out which of the subdomains that were listening on port 80.
Golang (Go) is a programming language that are becoming more and more popular and I have seen many interesting tools that are written in Go. Since Go are not being installed by default in Kali Linux I thought that publishing a quick-start guide could be a good idea.
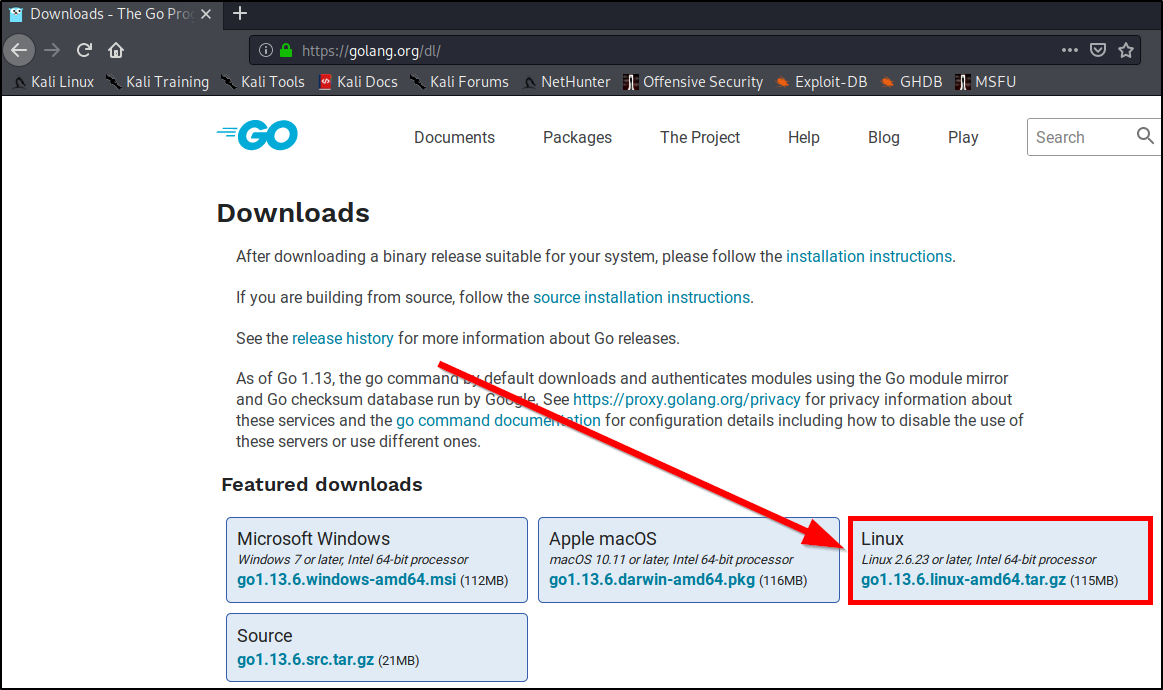
Download the latest version for Linux – “gox.xx.x.linux-amd64.tar.gz”
Open your terminal and navigate to your downloads folder cd /root/Downloads
Extract the files tar -C /usr/local/ -xzf go1.13.6.linux-amd64.tar.gz
Add variables for GO by modifying “~/.bashrc” vim ~/.bashrc Add the following paths to the end of the file export GOPATH=/root/go-workspace export GOROOT=/usr/local/go PATH=$PATH:$GOROOT/bin/:$GOPATH/bin
Now we need to refresh the bashrc to get the updated variables source ~/.bashrc
Now we just need to verify that everything is correct configured and we can do that by creating a simple ‘hello world’ program in Go. vim helloworld.go Add the following code to the file: package main import "fmt" func main() { fmt.Printf("Hello world!\n") } Then save the file and try to run the program: go run helloworld.go If everything was configured correctly you should see something like this: You are now ready to use Golang on your Kali Linux machine!
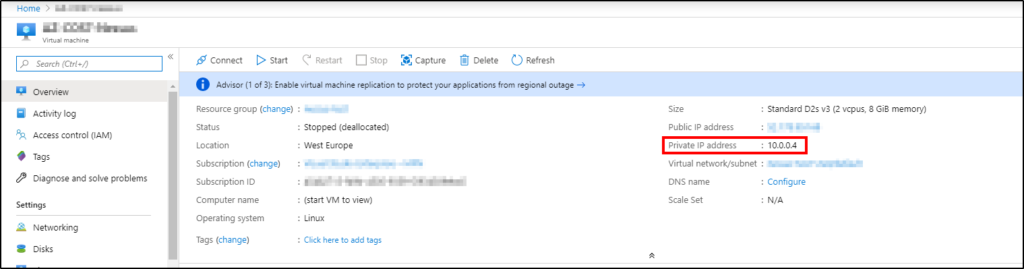
Have you just created your first Azure VM and are looking for a good, secure way to connect to you new machine without exposing more than necessary to the internet? Maybe you just want to run a few machines and don’t want to spend money on firewalls to configure VPN to your Azure Virtual Network (VNET)?
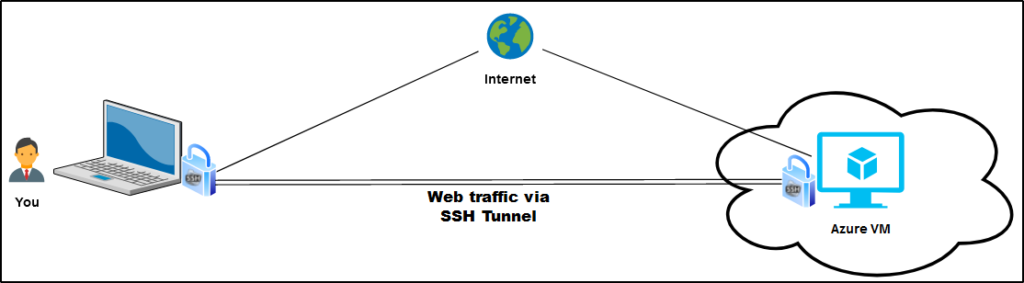
In this post I will explain a method that can be used to connect to your machine securely without any cost. After reading this post you will know how you can set up a SSH tunnel to your machine so you only need to expose TCP port 22 to the internet. I will also show you how you can limit the access to that port by configuring a Network Security Group (NSG) in Microsoft Azure to only allow your own IP to connect. You will connect to the VM using Putty and either Google Chrome or Mozilla Firefox. We start off by configuring the NSG in Azure.
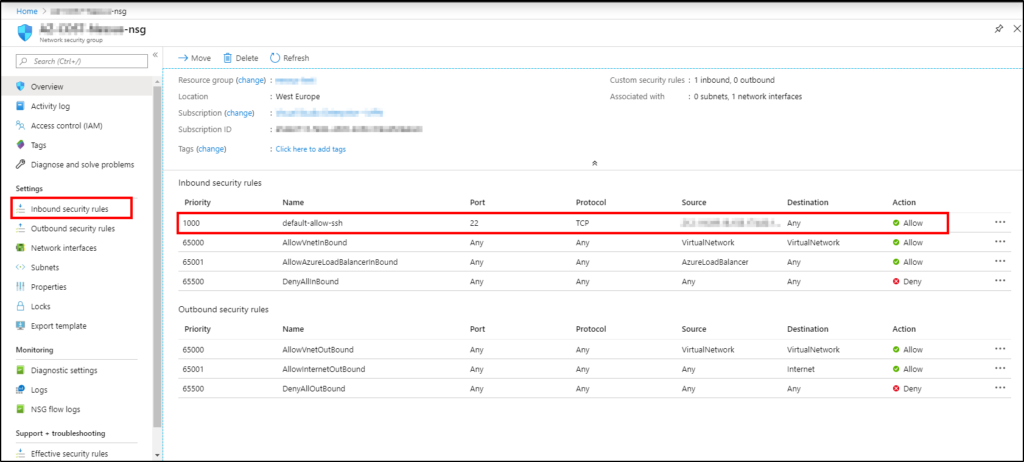
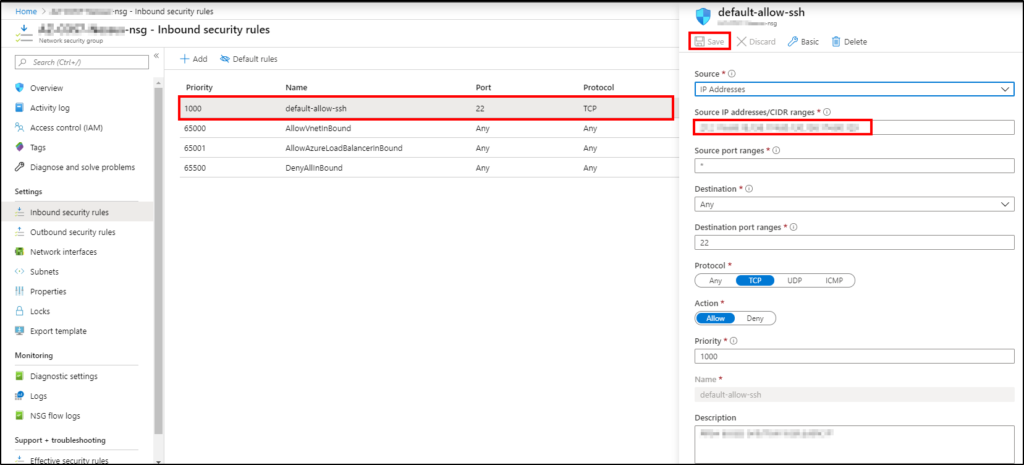
Configuring NSG in Azure: The first thing that we need to do is to allow you to SSH to your machine and we do that by configuring the NSG. You want to modify the inbound security rule named ‘default-allow-ssh’ and you do that by clicking on ‘Inbound security rules’ in the left menu.
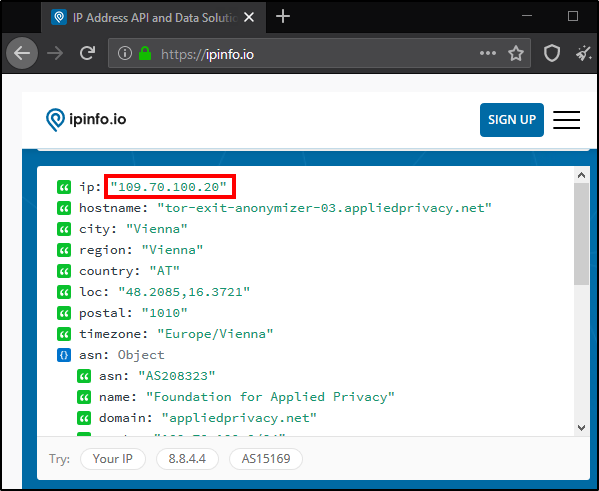
You should now add your public IP to the rule to allow you to connect from your home network. You probably know how to get your public IP but if you don’t know, one simple way is by visiting https://ipinfo.io and copy the address from there.
When you have the IP ready, click on the ‘default-allow-ssh’-rule to expand it and then add your IP to ‘Source IP addresses/CIDR ranges’ and press ‘Save’.
The Azure configuration is now done. Lets move on to the Putty configuration.
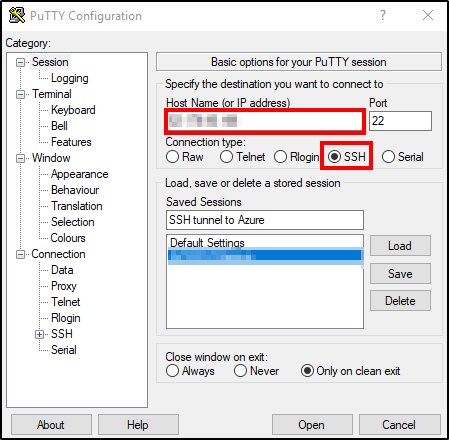
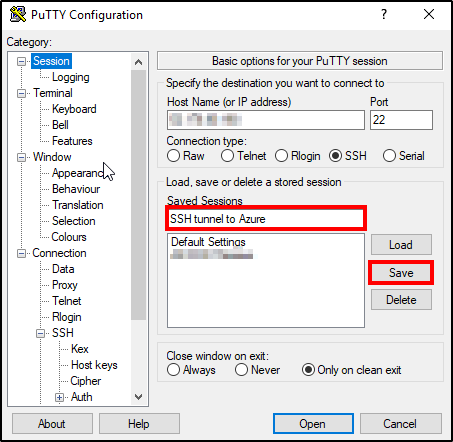
Configuring Putty: If you don’t have Putty installed you can download it from the official website and then just install it. After you have installed the software the first step is to run Putty and add the public IP of your Azure VM and select SSH port 22.
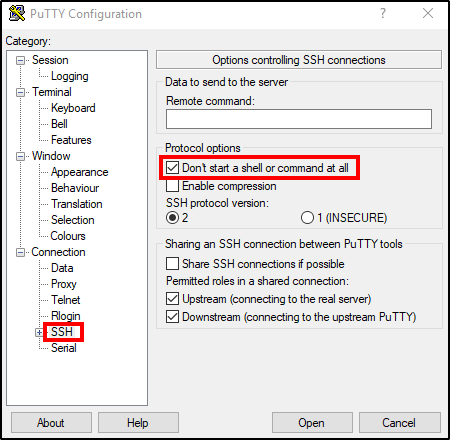
Then navigate to SSH and check ‘Don’t start a shell or command at all’.
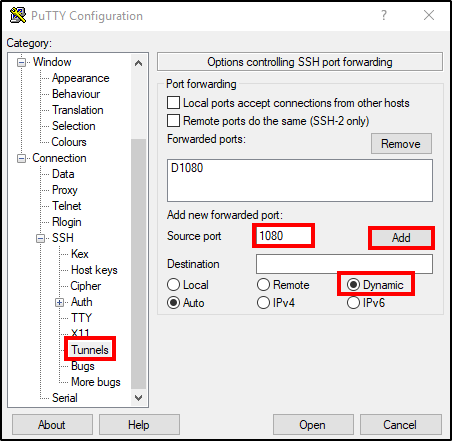
Move on by expanding SSH (+) and go to Tunnels. Add a forwarded port by choosing ‘Source port’. In this example we use port 1080. Select ‘Dynamic’ for destination and then press ‘Add’. Now you should see ‘D1080’ added above.
If you don’t want to configure these settings every time you want to use the tunnel you can save the session. That is done by going back to ‘Session’ and enter a name and then press ‘Save’.
Now the tunnel is ready and we just need to start it. Click on ‘Open’, enter your SSH credentials and press enter and the tunnel should be up and running.
Verify that the tunnel works: You will probably want to make sure that the tunnel works as expected and we can verify that by configuring a simple HTTP server on the VM. In this example CentOS7 was used but it can be done on most machines.
Step one is to open another putty window and connect to you VM via SSH. Navigate to your home folder (cd /home) and create a directory (mkdir testfolder). Cd into that folder and create a testfile (touch text.txt). Then run the following command to run a python based HTTP-server on port 80.
sudo python -m SimpleHTTPServer 80
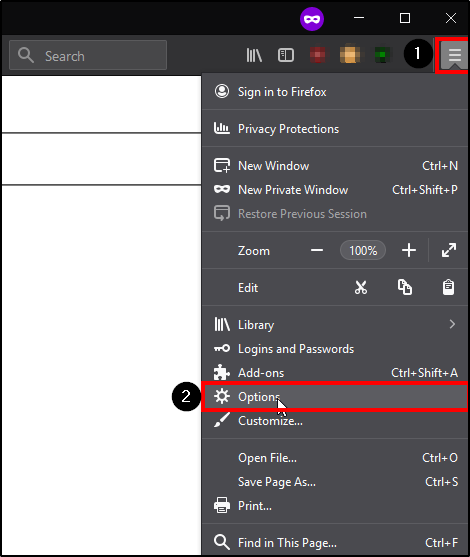
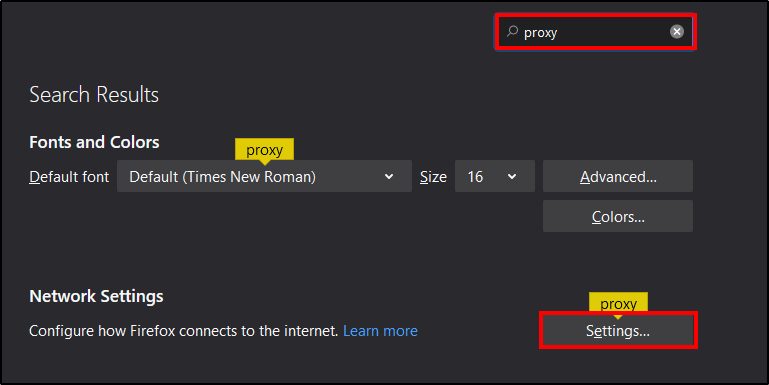
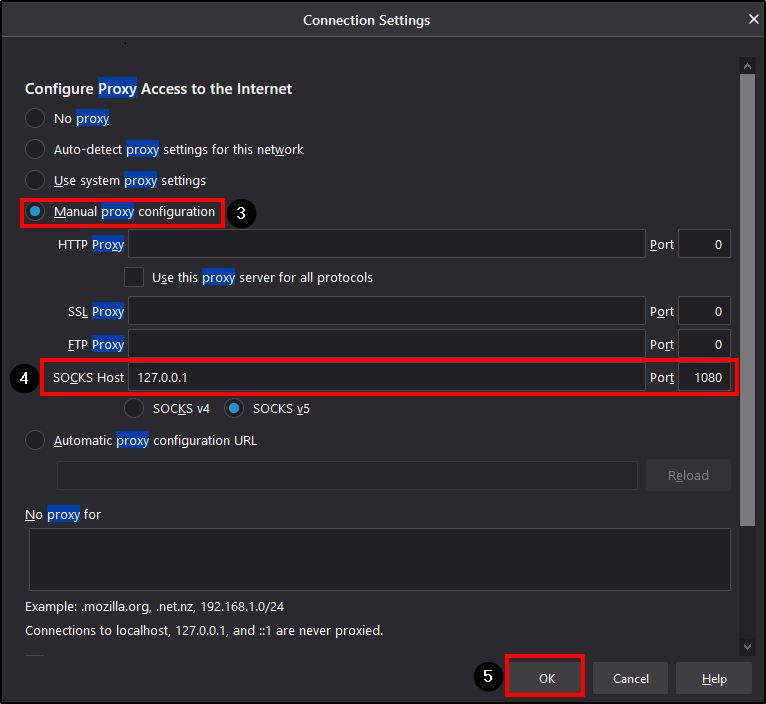
Your server will now listen for incoming connections on port 80. But since you don’t allow any connections to port 80 in the NSG you won’t be able to go directly to port 80. We need to send our HTTP traffic in the SSH tunnel to be able to reach it and we do that by configuring proxy settings in our web browser. This can be done in most of the common browsers and I will show you how to do it in Firefox and Chrome.
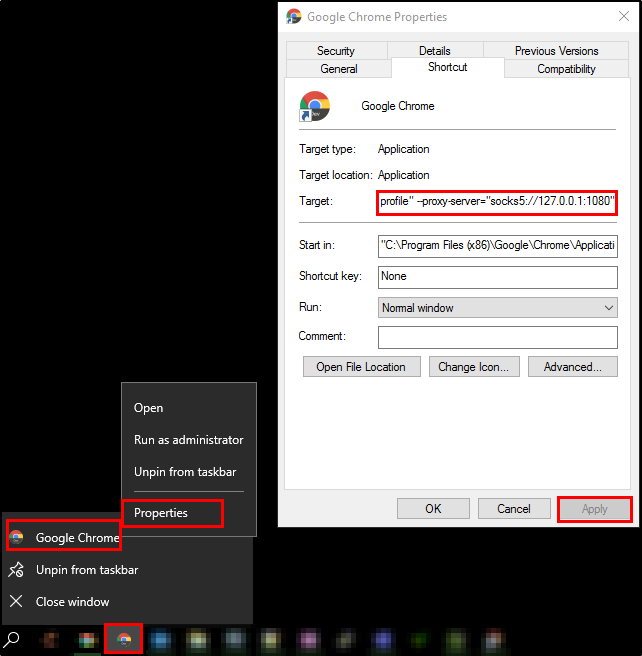
Chrome: To configure proxy for Chrome you just right click on Chrome in the task bar and select ‘Properties’. You then need to add some run parameters.