How to launch Command Prompt and powershell from MS Paint

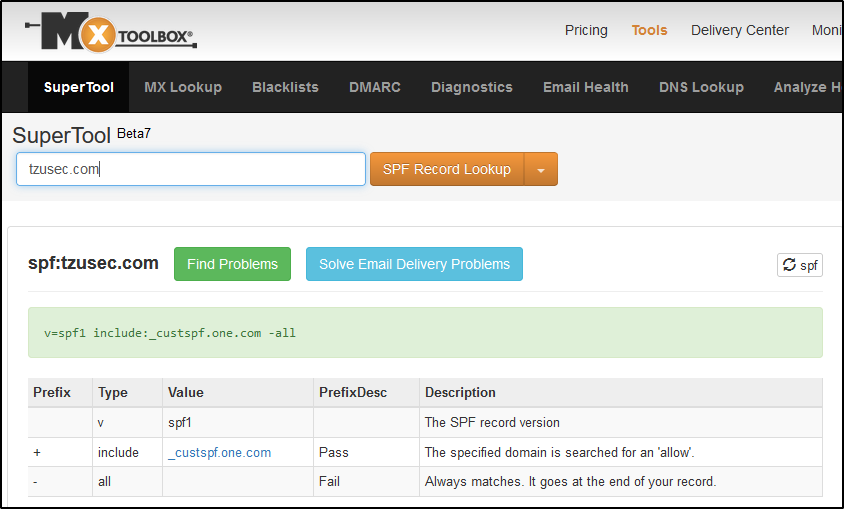
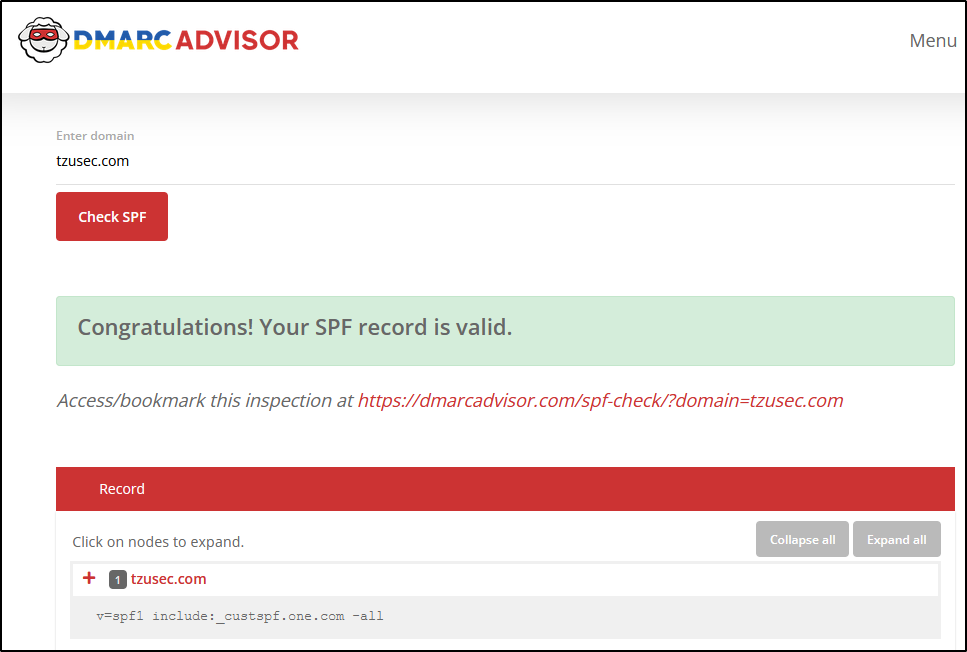
This guide will show you how you can launch cmd and Powershell with help from Microsoft Paint. Sometimes organisations environments are being locked down and are preventing users from right clicking and opening tools such as cmd.exe or powershell.exe. When I face that during a penetration test I usually try this simple mspaint hack to check if I can get around the organisations defensive measures.

How to launch Command Prompt (cmd.exe)

  1. Open Paint
  2. Press Resize
  3. Configure the size
    1. Uncheck “Maintain Aspect Ratio”
    2. Click on “Pixels”
    3. Horizontal: 6
    4. Vertical: 1
    5. Press OK
  4. Zoom in so you can see the pixels.
  5. The next step is to color these six pixels in the correct colors. Press “Edit colors’ and then change the colors for each pixel according to the list below. You modify the colors by changing the values of Red, Green and Blue:
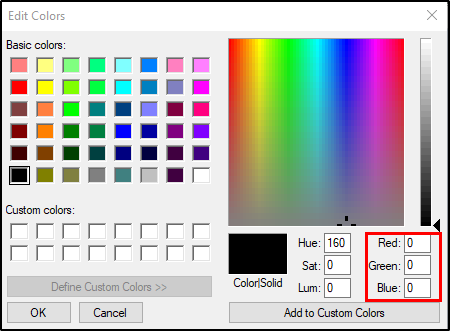
    edit-colors
    Colors for each pixel:
    1. Red(10), Green(0), Blue(0)
    2. Red(13), Green(10), Blue(13)
    3. Red(100), Green(109), Blue(99)
    4. Red(120), Green(101), Blue(46)
    5. Red(0), Green(0), Blue(101)
    6. Red(0), Green(0), Blue(0)
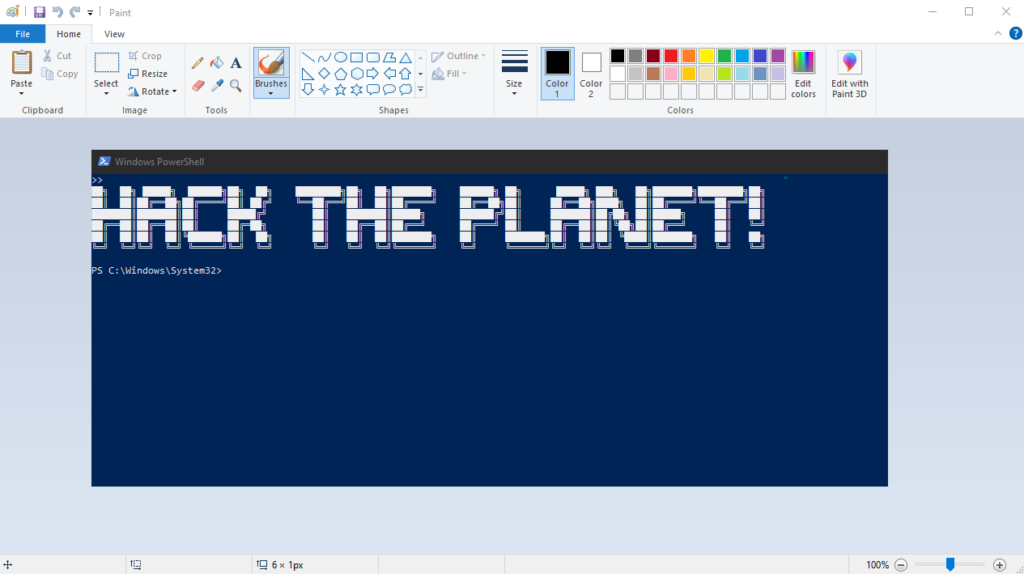
  6. When you have filled the pixels with the correct colors it should look like this:
    picture-of-correct-colors-in-pain
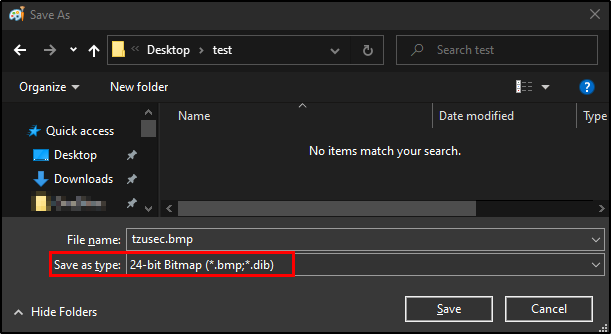
  7. The next step is to save the file by pressing “Save As” and then changing file format to “24-bit Bitmap”.
    save-as-bmp
  8. Now the last step is to change the file format of the file from .BMP to .BAT
  9. Now just double click on the new .BAT-file.
  10. Voila

How to launch Powershell

The process is the same for powershell, the only difference are the colors. Instead of the colors above use these:

  1. Red(10), Green(0), Blue(0)
  2. Red(13), Green(10), Blue(13)
  3. Red(119), Green(111), Blue(112)
  4. Red(115), Green(114), Blue(101)
  5. Red(108), Green(101), Blue(104)
  6. Red(0), Green(0), Blue(108)

How it works:

What we do is changing the color of the six pixels so that they in heaxdecimal represents ‘cmd.exe’/’powershell’. When we save the file to .BMP the encoding algorithm converts the RGB colors to ASCII data. When that is done and we change the file format to .BAT the .BAT script containts the instruction ‘cmd.exe’/’powershell’ that will be executed when we double click on the script.

I hope you did found this useful. It’s a pretty cool trick to have in your arsenal during penetration tests.

// Rickard Carlsson

What is SPF and how do you configure it?

What is SPF?

SPF stands for Sender Policy Framework and is an email autentication method. It helps the receiving mail server to verify whether an email have been sent from an allowed email server or not.

Your SPF policy is set up by publishing it in the form of a TXT record in your DNS. It works as an allow list for your domain and you declare where emails from your domain can originate from. Worth to mention is that this policy doesn’t prevent spoofed emails from being sent, but it allows receiving email servers to verify if the email was sent from a legit source.

How to configure SPF?

You configure SPF by adding a TXT record to your DNS. Begin your spf record by adding the protocol version and version 1 (spf1) is currently being used:
v=spf1

Then add the IP adresses or other SPF-record that you want to include. For example:

Add a specific IP address:
ip4:23.103.224.10
Or include another SPF-record, for example the record for Microsoft Exchange Online:
include:spf.protection.outlook.com

Lastly add the instruction to receiving email servers on how to act if the sender address is not included in your SPF-record. The most common way is to set it to “StrictFail” which means that you instruct the server to reject the email.
-all

So in this case the SPF record would look like this:

v=spf1 ip4:23.103.224.10 include:spf.protection.outlook.com -all

Verify your SPF-record

When you have created your SPF-record it’s a good idea to verify that everything looks good. There are many different ways to inspect your SPF-record, you can either use an online tool like mxtoolbox or dmarcadvisor or you can check it manually.

Verify with MXToolbox

Open your browser and browse to https://mxtoolbox.com/SuperTool.aspx and enter the domain your want to inspect and then press “SPF Record Lookup”:

Screenshot from MXToolbox SuperTool

Verify with Dmarcadvisor

Open your browser and browse to https://dmarcadvisor.com/spf-check and enter the domain name your want to inspect and then press “Check SPF”:

Screenshot from DmarcAdvisor

Verify with Powershell (Windows)

Resolve-DnsName -Type TXT -Name tzusec.com

Verify using Linux

dig +short tzusec.com txt


// Rickard

Find all non-default services on you Windows machine with Powershell

I just released a new video on Youtube where I show you how to use my new Powershell script for getting a list of all services that run on your windows machine that are not default services. You probably won’t need a video instruction on how to run a simple Powershell script but I’m sure it can help someone who is not so familiar with scripts.

The script is not something fancy, just a simple script that will list all non-default services and show you the info you might want to know.

  • Display Name
  • State
  • Start Mode
  • Status
  • Process ID
  • Exe Path
  • Description

Here is a link to the script:
https://github.com/tzusec/Get-NonDefault-Services

// Rickard

Copyright © 2022